Outlook Online - How to filter and sort your emails Video

In this video, you will learn how to filter and sort your emails in Outlook.
The video covers the different ways to sort and filter your inbox, including using the Focused Inbox feature.
It explains how Outlook determines what emails are considered "Focused" and how to disable this feature if desired.
The video also demonstrates how to use filters to display specific items in your inbox, such as unread messages, flagged messages, or messages with attachments.
Additionally, it shows how to sort your emails by date, sender, size, importance, or subject.
Learning these techniques will help you efficiently manage your emails and find the information you need.

  • 3:03
  • 2648 views
Video Player is loading.
Introduction
Current Time 0:00
Duration 0:00
Loaded: 0%
Stream Type LIVE
Remaining Time 0:00
1x
  • Chapters
  • descriptions off, selected
  • captions off, selected

    Objectifs :

    This document aims to provide a comprehensive overview of how to effectively sort and filter emails in the Outlook Web App, enhancing user productivity and email management.


    Chapitres :

    1. Introduction to Email Management in Outlook
      Managing a high volume of emails can be challenging. The Outlook Web App offers various tools to help users sort and filter their inbox efficiently. This guide will explore the features available for organizing emails, focusing on the Focused Inbox, filtering options, and sorting methods.
    2. Understanding Focused Inbox
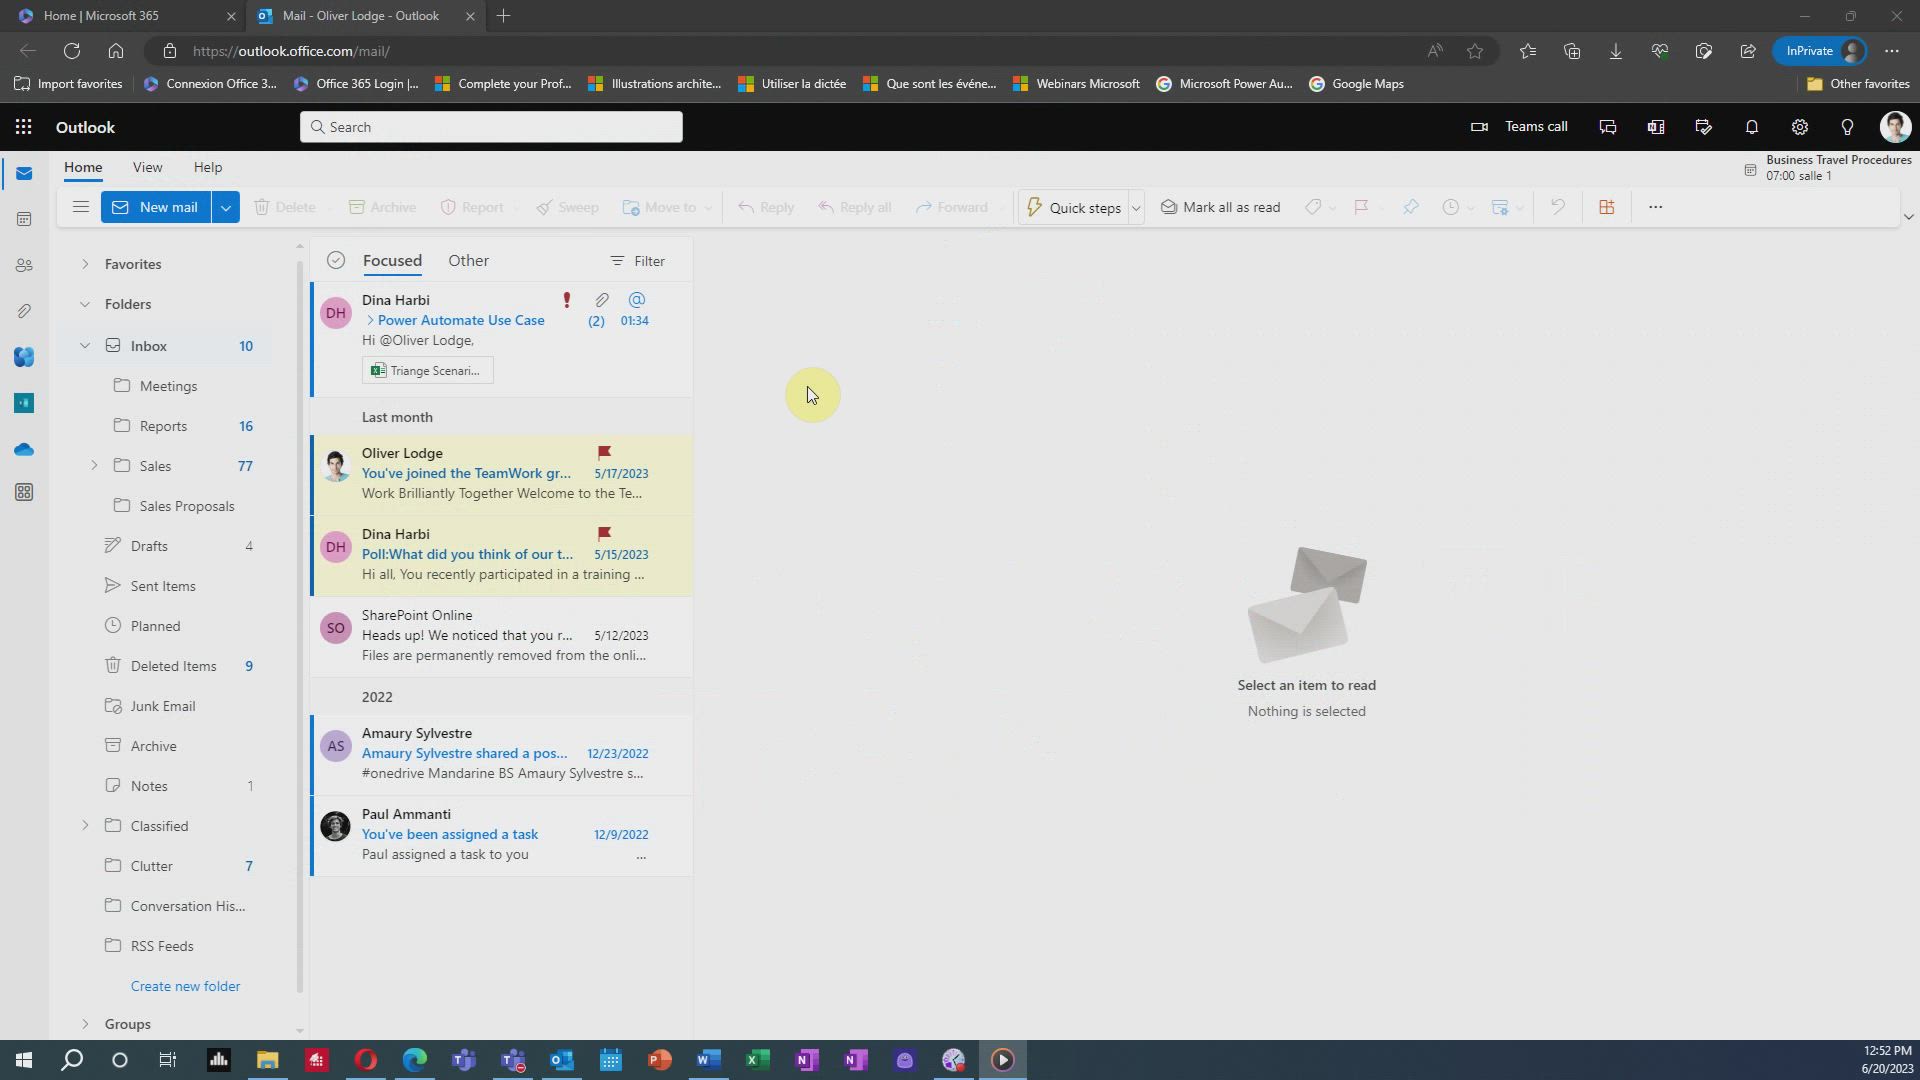
      The Focused Inbox feature in Outlook separates your inbox into two tabs: Focused and Other. - **Focused Tab**: Contains your most important emails. - **Other Tab**: Houses less critical messages, such as newsletters, making them easily accessible but out of the way. **How Does Outlook Determine Focused Emails?** Outlook analyzes your email history, considering the types of messages you receive, their content, and your most frequent contacts. It then curates a list of emails you are likely to read and respond to. If you prefer not to use the Focused Inbox, you can disable it through the settings in the Outlook Web App.
    3. Using Filters in Outlook
      Filters allow you to define specific criteria for the emails you want to view. This is particularly useful when searching for particular messages within folders like Inbox or Sent Items. **How to Apply Filters:** 1. Click the **Filter** button located in the top right corner of your message pane. 2. Choose from the predefined filter options: - **All**: Displays all messages without filters. - **Unread**: Shows only unread messages. - **Flagged**: Displays messages marked for follow-up. - **To Me**: Shows messages sent to or copied to you. - **With Attachments**: Displays messages that include attached files. - **Mentions Me**: Highlights messages that specifically call your attention using the '@' symbol.
    4. Sorting Emails in Outlook
      Sorting allows you to rearrange the display of emails in your message pane. By default, emails are sorted by date in descending order, meaning the newest messages appear at the top. **Sorting Options:** To sort your emails: 1. Click the **Filter** button in the top right corner of your message pane. 2. Select the **Sort** option. You can sort emails by: - **Date**: Default view, showing the most recent messages first. - **From**: Groups messages received from the same sender. - **Size**: Sorts emails based on their size. - **Subject**: Arranges messages alphabetically by subject. - **No Subject**: Messages without a subject line will appear first, followed by those with subjects in alphabetical order.
    5. Conclusion
      Effectively managing your inbox in the Outlook Web App is crucial for maintaining productivity. By utilizing the Focused Inbox, applying filters, and sorting emails, users can streamline their email experience. These features not only help in organizing emails but also ensure that important messages are prioritized, making email management more efficient.

    FAQ :

    What is the Focused Inbox in Outlook?

    The Focused Inbox is a feature that organizes your inbox into two tabs: Focused, which contains your most important emails, and Other, which holds the rest. This helps you prioritize your email management.

    How does Outlook determine which emails are focused?

    Outlook analyzes your email history, considering the types of messages you receive, their content, and your communication patterns with other users to decide which emails are most likely to be important to you.

    Can I disable the Focused Inbox feature?

    Yes, you can disable the Focused Inbox feature in the Outlook Web App by going to the settings menu.

    What are some predefined filters available in Outlook?

    Predefined filters in Outlook include options to view all messages, unread messages, flagged messages, messages sent to you, messages with attachments, and mentions that call your attention.

    How can I sort my emails in Outlook?

    You can sort your emails by clicking the Filter button in the top right corner of the message pane and selecting your preferred sorting option, such as by date, sender, size, or subject.

    What happens if I sort by size in Outlook?

    Sorting by size will arrange your emails based on their file size, allowing you to quickly identify larger messages that may take up more storage space.


    Quelques cas d'usages :

    Managing High Email Volume

    In a busy work environment, using the Focused Inbox feature can help professionals prioritize important emails, ensuring they respond to critical messages promptly while keeping less urgent emails accessible.

    Organizing Project Emails

    When working on a project, team members can use filtering to display only emails related to that project, such as flagged messages or those with specific attachments, improving collaboration and efficiency.

    Email Cleanup

    By sorting emails by size, users can identify and delete large attachments or unnecessary emails, freeing up storage space and keeping their inbox organized.

    Follow-Up Management

    Using flagged messages, professionals can easily track emails that require follow-up, ensuring that important tasks are not overlooked and deadlines are met.

    Quick Access to Important Contacts

    By filtering messages to show only those from specific users, professionals can quickly access communications from key contacts, streamlining their workflow and enhancing productivity.


    Glossaire :

    Outlook

    A personal information manager from Microsoft, primarily used for email communication, calendar management, task management, and contact management.

    Focused Inbox

    A feature in Outlook that separates your inbox into two tabs: Focused and Other, prioritizing important emails in the Focused tab.

    Predefined filters

    Filters that are built into the Outlook Web App, allowing users to quickly sort and display emails based on specific criteria.

    Sorting

    The process of rearranging the display of items in the message pane, typically by date, sender, size, or subject.

    Filtering

    The act of defining specific criteria to display only certain items in a view, such as unread messages or messages from a specific sender.

    Message pane

    The area in the Outlook Web App where emails are displayed, allowing users to read and manage their messages.

    Flagged messages

    Emails that have been marked for follow-up or review, making them easier to find later.

    Attachments

    Files that are sent along with an email message, which can include documents, images, or other types of files.

    At symbol (@)

    A character used in email addresses and to mention users in messages, indicating a specific person or topic.
    00:00:00
    When you have a lot of emails coming in,
    00:00:04
    Outlook gives you a few different
    00:00:05
    ways to sort and filter your inbox.
    00:00:08
    The Outlook Web App possesses a number
    00:00:10
    of predefined filters available for use.
    00:00:13
    Focused Inbox separates your Outlook
    00:00:15
    inbox into two tabs, Focused and Other.
    00:00:18
    Your most important e-mail
    00:00:20
    messages are on the Focus tab,
    00:00:22
    while the rest remain easily accessible
    00:00:24
    but out of the way on the other tag.
    00:00:27
    For instance, newsletters.
    00:00:28
    How does Outlook decide what is Focused?
    00:00:32
    Focused Inbox Studies the
    00:00:33
    history of your e-mail used,
    00:00:35
    taking into account the types
    00:00:37
    of messages you receive,
    00:00:38
    the content of those messages,
    00:00:39
    and the users you communicate with the most.
    00:00:42
    It then determines which emails you
    00:00:44
    are most likely to read and respond to
    00:00:47
    and places them on a centralized list.
    00:00:49
    If you are not satisfied with
    00:00:51
    the Focused Inbox feature,
    00:00:53
    you can easily disable it
    00:00:54
    from the Outlook Web App.
    00:00:56
    Just go to settings.
    00:00:59
    Now let's find out how filtering and
    00:01:01
    sorting messages in Outlook Online work,
    00:01:03
    starting with filters.
    00:01:05
    A view filter involves defining items
    00:01:07
    you want to appear in a particular
    00:01:10
    view to display only items that
    00:01:12
    meet the conditions you specify.
    00:01:14
    For instance,
    00:01:15
    when searching for a particular
    00:01:17
    message or group of messages
    00:01:19
    within a folder such as Inbox,
    00:01:21
    Sent Items, Personal Folder, etc,
    00:01:24
    the Outlook Web App possesses a number
    00:01:27
    of predefined filters available for use.
    00:01:29
    Just click the Filter button in the
    00:01:31
    top right corner of your message pane,
    00:01:33
    then apply one of those options.
    00:01:35
    All displays all messages
    00:01:38
    without filters applied.
    00:01:39
    Unread displays messages
    00:01:41
    that are marked as unread,
    00:01:43
    Flagged displays messages
    00:01:45
    containing a flag for follow up,
    00:01:47
    review, etc.
    00:01:48
    To me displays messages sent to
    00:01:52
    or copied to the user as files.
    00:01:55
    Display messages with attached files.
    00:01:59
    Mentions me displays messages calling
    00:02:01
    specifically your attention on a
    00:02:04
    particular task or topic with the at symbol.
    00:02:07
    Now let's move on to sorting.
    00:02:09
    Sorting involves rearranging the
    00:02:10
    display of items in the message pane.
    00:02:12
    By default,
    00:02:13
    messages in any folder are arranged
    00:02:15
    by date in descending order.
    00:02:17
    This means the newest message
    00:02:19
    is displayed on top.
    00:02:20
    Outlook Online provides several sort
    00:02:22
    options to arrange the display of messages.
    00:02:25
    Just click the Filter button in the
    00:02:27
    top right corner of your message pane,
    00:02:29
    then sort.
    00:02:30
    You also have the possibility
    00:02:32
    to sort your emails by date.
    00:02:34
    This is the default view in Outlook Online.
    00:02:37
    Sorting by from groups messages
    00:02:40
    received from the same user.
    00:02:43
    You can also sort your messages by size,
    00:02:47
    important or subject,
    00:02:48
    and messages with no subject line will
    00:02:52
    appear 1st and then alphabetically.
    00:02:55
    Now don't forget sort by date again to
    00:02:57
    display the most recent messages on top.

    No elements match your search in this video....
    Do another search or back to content !


    00:00:00
    Quando você tem muitos e-mails chegando,
    00:00:04
    O Outlook dá-lhe algumas
    00:00:05
    formas de ordenar e filtrar a sua caixa de entrada.
    00:00:08
    O Outlook Web App possui um número
    00:00:10
    de filtros predefinidos disponíveis para utilização.
    00:00:13
    A Caixa de Entrada Focada separa o Outlook
    00:00:15
    caixa de entrada em duas guias, Focado e Outro.
    00:00:18
    O seu e-mail mais importante
    00:00:20
    as mensagens estão na guia Foco,
    00:00:22
    enquanto o resto permanece facilmente acessível
    00:00:24
    mas fora do caminho na outra tag.
    00:00:27
    Por exemplo, boletins informativos.
    00:00:28
    Como o Outlook decide o que é Focado?
    00:00:32
    A caixa de entrada focada estuda o
    00:00:33
    histórico do seu e-mail utilizado,
    00:00:35
    tendo em conta os tipos
    00:00:37
    Número de mensagens recebidas,
    00:00:38
    o conteúdo dessas mensagens,
    00:00:39
    e os usuários com quem você mais se comunica.
    00:00:42
    Em seguida, ele determina quais e-mails você
    00:00:44
    têm maior probabilidade de ler e responder a
    00:00:47
    e coloca-os numa lista centralizada.
    00:00:49
    Se você não está satisfeito com
    00:00:51
    o recurso Caixa de entrada focada,
    00:00:53
    você pode facilmente desativá-lo
    00:00:54
    do Outlook Web App.
    00:00:56
    Basta ir às configurações.
    00:00:59
    Agora vamos descobrir como filtrar e
    00:01:01
    ordenar mensagens no trabalho do Outlook Online,
    00:01:03
    começando pelos filtros.
    00:01:05
    Um filtro de exibição envolve a definição de itens
    00:01:07
    você deseja aparecer em um particular
    00:01:10
    para exibir apenas itens que
    00:01:12
    satisfazer as condições que especificar.
    00:01:14
    Por exemplo,
    00:01:15
    ao procurar um
    00:01:17
    mensagem ou grupo de mensagens
    00:01:19
    dentro de uma pasta como a Caixa de Entrada,
    00:01:21
    Itens Enviados, Pasta Pessoal, etc,
    00:01:24
    o Outlook Web App possui um número
    00:01:27
    de filtros predefinidos disponíveis para utilização.
    00:01:29
    Basta clicar no botão Filtrar no botão
    00:01:31
    canto superior direito do painel de mensagens,
    00:01:33
    em seguida, aplique uma dessas opções.
    00:01:35
    Tudo exibe todas as mensagens
    00:01:38
    sem filtros aplicados.
    00:01:39
    Não lido exibe mensagens
    00:01:41
    marcados como não lidos,
    00:01:43
    Sinalizado exibe mensagens
    00:01:45
    contendo uma bandeira para acompanhamento,
    00:01:47
    revisão, etc.
    00:01:48
    Para mim exibe mensagens enviadas para
    00:01:52
    ou copiado para o usuário como arquivos.
    00:01:55
    Exiba mensagens com arquivos anexados.
    00:01:59
    Menções me exibe mensagens chamando
    00:02:01
    especificamente a sua atenção sobre um
    00:02:04
    tarefa ou tópico específico com o símbolo at.
    00:02:07
    Agora vamos passar para a classificação.
    00:02:09
    A classificação envolve reorganizar o
    00:02:10
    Exibição de itens no painel de mensagens.
    00:02:12
    Por padrão,
    00:02:13
    as mensagens em qualquer pasta são organizadas
    00:02:15
    por data, por ordem decrescente.
    00:02:17
    Isto significa a mensagem mais recente
    00:02:19
    é exibido na parte superior.
    00:02:20
    O Outlook Online fornece vários tipos
    00:02:22
    opções para organizar a exibição de mensagens.
    00:02:25
    Basta clicar no botão Filtrar no botão
    00:02:27
    canto superior direito do painel de mensagens,
    00:02:29
    em seguida, ordene.
    00:02:30
    Você também tem a possibilidade de
    00:02:32
    para ordenar os seus e-mails por data.
    00:02:34
    Esta é a vista predefinida no Outlook Online.
    00:02:37
    Ordenar por mensagens de grupos
    00:02:40
    recebidas do mesmo utilizador.
    00:02:43
    Você também pode classificar suas mensagens por tamanho,
    00:02:47
    importante ou assunto,
    00:02:48
    e mensagens sem linha de assunto
    00:02:52
    aparecem em 1º e depois por ordem alfabética.
    00:02:55
    Agora não se esqueça de ordenar por data novamente para
    00:02:57
    Exiba as mensagens mais recentes na parte superior.

    No elements match your search in this video....
    Do another search or back to content !


    00:00:00
    عندما يكون لديك الكثير من رسائل البريد الإلكتروني الواردة ،
    00:00:04
    يمنحك Outlook بعض الأشياء المختلفة
    00:00:05
    طرق لفرز وتصفية البريد الوارد الخاص بك.
    00:00:08
    يمتلك Outlook Web App رقما
    00:00:10
    من المرشحات المحددة مسبقا المتاحة للاستخدام.
    00:00:13
    تفصل علبة الوارد المركزة Outlook الخاص بك
    00:00:15
    البريد الوارد في علامتي تبويب ، مركزة وغيرها.
    00:00:18
    بريدك الإلكتروني الأكثر أهمية
    00:00:20
    الرسائل موجودة في علامة التبويب "التركيز" ،
    00:00:22
    بينما يظل الوصول إلى الباقي سهلا
    00:00:24
    ولكن بعيدا عن الطريق على العلامة الأخرى.
    00:00:27
    على سبيل المثال ، النشرات الإخبارية.
    00:00:28
    كيف يقرر Outlook ما هو المركز؟
    00:00:32
    يدرس البريد الوارد المركز
    00:00:33
    تاريخ البريد الإلكتروني الخاص بك المستخدمة ،
    00:00:35
    مع مراعاة الأنواع
    00:00:37
    عدد الرسائل التي تتلقاها،
    00:00:38
    محتوى تلك الرسائل،
    00:00:39
    والمستخدمين الذين تتواصل معهم أكثر من غيرهم.
    00:00:42
    ثم يحدد رسائل البريد الإلكتروني التي
    00:00:44
    هم الأكثر احتمالا للقراءة والرد على
    00:00:47
    ويضعهم في قائمة مركزية.
    00:00:49
    إذا لم تكن راضيا عن
    00:00:51
    ميزة البريد الوارد المركز ،
    00:00:53
    يمكنك تعطيله بسهولة
    00:00:54
    من Outlook Web App.
    00:00:56
    فقط اذهب إلى الإعدادات.
    00:00:59
    الآن دعنا نتعرف على كيفية التصفية و
    00:01:01
    فرز الرسائل في عمل Outlook Online ،
    00:01:03
    بدءا من المرشحات.
    00:01:05
    يتضمن عامل تصفية العرض تعريف العناصر
    00:01:07
    تريد أن تظهر في معين
    00:01:10
    عرض لعرض العناصر التي فقط
    00:01:12
    استيفاء الشروط التي تحددها.
    00:01:14
    على سبيل المثال،
    00:01:15
    عند البحث عن معين
    00:01:17
    رسالة أو مجموعة من الرسائل
    00:01:19
    داخل مجلد مثل علبة الوارد،
    00:01:21
    العناصر المرسلة ، المجلد الشخصي ، إلخ ،
    00:01:24
    يمتلك Outlook Web App رقما
    00:01:27
    من المرشحات المحددة مسبقا المتاحة للاستخدام.
    00:01:29
    فقط انقر فوق الزر "تصفية" في ملف
    00:01:31
    الزاوية العلوية اليمنى من جزء الرسائل ،
    00:01:33
    ثم قم بتطبيق أحد هذه الخيارات.
    00:01:35
    يعرض الكل جميع الرسائل
    00:01:38
    بدون تطبيق المرشحات.
    00:01:39
    يعرض الرسائل غير المقروءة
    00:01:41
    التي تم وضع علامة عليها على أنها غير مقروءة ،
    00:01:43
    يعرض وضع علامة على الرسائل
    00:01:45
    تحتوي على علامة للمتابعة ،
    00:01:47
    مراجعة ، إلخ.
    00:01:48
    بالنسبة لي يعرض الرسائل المرسلة إلى
    00:01:52
    أو نسخها إلى المستخدم كملفات.
    00:01:55
    عرض الرسائل مع الملفات المرفقة.
    00:01:59
    يذكر لي يعرض الرسائل التي تدعو
    00:02:01
    على وجه التحديد انتباهك على
    00:02:04
    مهمة أو موضوع معين مع الرمز AT.
    00:02:07
    الآن دعنا ننتقل إلى الفرز.
    00:02:09
    يتضمن الفرز إعادة ترتيب
    00:02:10
    عرض العناصر في جزء الرسالة.
    00:02:12
    بشكل افتراضي ،
    00:02:13
    يتم ترتيب الرسائل في أي مجلد
    00:02:15
    حسب التاريخ بترتيب تنازلي.
    00:02:17
    هذا يعني أحدث رسالة
    00:02:19
    يتم عرضه في الأعلى.
    00:02:20
    يوفر Outlook Online عدة أنواع
    00:02:22
    خيارات لترتيب عرض الرسائل.
    00:02:25
    فقط انقر فوق الزر "تصفية" في ملف
    00:02:27
    الزاوية العلوية اليمنى من جزء الرسائل ،
    00:02:29
    ثم فرز.
    00:02:30
    لديك أيضا إمكانية
    00:02:32
    لفرز رسائل البريد الإلكتروني حسب التاريخ.
    00:02:34
    هذه هي طريقة العرض الافتراضية في Outlook عبر الإنترنت.
    00:02:37
    الفرز حسب من رسائل المجموعات
    00:02:40
    وردت من نفس المستخدم.
    00:02:43
    يمكنك أيضا فرز رسائلك حسب الحجم ،
    00:02:47
    مهم أو موضوع ،
    00:02:48
    والرسائل التي لا تحتوي على سطر موضوع
    00:02:52
    تظهر 1 ثم أبجديا.
    00:02:55
    الآن لا تنس الفرز حسب التاريخ مرة أخرى إلى
    00:02:57
    عرض أحدث الرسائل في الأعلى.

    No elements match your search in this video....
    Do another search or back to content !


    00:00:00
    Wenn viele E-Mails eingehen,
    00:00:04
    Outlook bietet Ihnen ein paar verschiedene
    00:00:05
    Möglichkeiten zum Sortieren und Filtern Ihres Posteingangs.
    00:00:08
    Die Outlook Web App besitzt eine Nummer
    00:00:10
    von vordefinierten Filtern, die zur Verwendung zur Verfügung stehen.
    00:00:13
    Posteingang mit Relevanz trennt Ihr Outlook
    00:00:15
    Posteingang in zwei Registerkarten, Fokussiert und Andere.
    00:00:18
    Ihre wichtigste E-Mail
    00:00:20
    Nachrichten befinden sich auf der Registerkarte Fokus,
    00:00:22
    während der Rest leicht zugänglich bleibt
    00:00:24
    aber auf dem anderen Tag aus dem Weg geräumt.
    00:00:27
    Zum Beispiel Newsletter.
    00:00:28
    Wie entscheidet Outlook, was fokussiert ist?
    00:00:32
    Fokussierter Posteingang untersucht die
    00:00:33
    Historie Ihrer E-Mail-Nutzung,
    00:00:35
    unter Berücksichtigung der Typen
    00:00:37
    der Nachrichten, die Sie erhalten,
    00:00:38
    den Inhalt dieser Mitteilungen,
    00:00:39
    und die Benutzer, mit denen Sie am meisten kommunizieren.
    00:00:42
    Es bestimmt dann, welche E-Mails Sie
    00:00:44
    am ehesten lesen und darauf antworten
    00:00:47
    und platziert sie auf einer zentralen Liste.
    00:00:49
    Wenn Sie mit
    00:00:51
    die Funktion "Posteingang mit Relevanz",
    00:00:53
    Sie können es ganz einfach deaktivieren
    00:00:54
    aus der Outlook Web App.
    00:00:56
    Gehen Sie einfach zu den Einstellungen.
    00:00:59
    Lassen Sie uns nun herausfinden, wie das Filtern und
    00:01:01
    Sortieren von Nachrichten in Outlook Online Arbeit,
    00:01:03
    Angefangen bei den Filtern.
    00:01:05
    Ein Ansichtsfilter umfasst das Definieren von Elementen
    00:01:07
    Sie möchten in einem bestimmten
    00:01:10
    , um nur Elemente anzuzeigen, die
    00:01:12
    die von Ihnen angegebenen Bedingungen erfüllen.
    00:01:14
    Zum Beispiel
    00:01:15
    bei der Suche nach einem bestimmten
    00:01:17
    Nachricht oder Gruppe von Nachrichten
    00:01:19
    in einem Ordner wie z. B. Posteingang,
    00:01:21
    Gesendete Elemente, persönlicher Ordner usw.,
    00:01:24
    Die Outlook Web App besitzt eine Nummer
    00:01:27
    von vordefinierten Filtern, die zur Verwendung zur Verfügung stehen.
    00:01:29
    Klicken Sie einfach auf die Schaltfläche Filter in der
    00:01:31
    in der oberen rechten Ecke des Nachrichtenfensters,
    00:01:33
    Wenden Sie dann eine dieser Optionen an.
    00:01:35
    Alle zeigt alle Meldungen an
    00:01:38
    ohne angewendete Filter.
    00:01:39
    Ungelesen zeigt Nachrichten an
    00:01:41
    die als ungelesen markiert sind,
    00:01:43
    Markiert zeigt Meldungen an
    00:01:45
    mit einer Markierung für die Nachverfolgung,
    00:01:47
    Überprüfung, usw.
    00:01:48
    An mich zeigt Nachrichten an, die an
    00:01:52
    oder als Dateien in den Benutzer kopiert werden.
    00:01:55
    Zeigen Sie Meldungen mit angehängten Dateien an.
    00:01:59
    Erwähnt mich zeigt Nachrichten an, die
    00:02:01
    insbesondere Ihre Aufmerksamkeit auf eine
    00:02:04
    Bestimmte Aufgabe oder Thema mit dem AT-Symbol.
    00:02:07
    Kommen wir nun zum Sortieren.
    00:02:09
    Beim Sortieren müssen die
    00:02:10
    Anzeige von Elementen im Meldungsbereich.
    00:02:12
    Standardmäßig
    00:02:13
    Nachrichten in einem beliebigen Ordner werden angeordnet
    00:02:15
    nach Datum in absteigender Reihenfolge.
    00:02:17
    Das bedeutet die neueste Nachricht
    00:02:19
    wird oben angezeigt.
    00:02:20
    Outlook Online bietet mehrere
    00:02:22
    Optionen zum Anordnen der Anzeige von Meldungen.
    00:02:25
    Klicken Sie einfach auf die Schaltfläche Filter in der
    00:02:27
    in der oberen rechten Ecke des Nachrichtenfensters,
    00:02:29
    Sortieren Sie dann.
    00:02:30
    Sie haben auch die Möglichkeit,
    00:02:32
    , um Ihre E-Mails nach Datum zu sortieren.
    00:02:34
    Dies ist die Standardansicht in Outlook Online.
    00:02:37
    Sortieren nach Gruppennachrichten
    00:02:40
    vom selben Benutzer erhalten haben.
    00:02:43
    Sie können Ihre Nachrichten auch nach Größe sortieren,
    00:02:47
    wichtig oder thematisch,
    00:02:48
    und Nachrichten ohne Betreffzeile
    00:02:52
    erscheinen an 1. Stelle und dann alphabetisch.
    00:02:55
    Vergessen Sie jetzt nicht, wieder nach Datum zu sortieren, um
    00:02:57
    Zeigen Sie die neuesten Nachrichten oben an.

    No elements match your search in this video....
    Do another search or back to content !


    00:00:00
    Cuando recibes muchos correos electrónicos,
    00:00:04
    Outlook le ofrece algunos
    00:00:05
    formas de ordenar y filtrar tu bandeja de entrada.
    00:00:08
    Outlook Web App posee una serie de
    00:00:10
    de filtros predefinidos disponibles para su uso.
    00:00:13
    La bandeja de entrada de Prioritarios separa tu Outlook
    00:00:15
    bandeja de entrada en dos pestañas, Enfocado y Otro.
    00:00:18
    Tu e-mail más importante
    00:00:20
    los mensajes están en la pestaña Enfoque,
    00:00:22
    mientras que el resto sigue siendo de fácil acceso
    00:00:24
    pero fuera del camino en la otra etiqueta.
    00:00:27
    Por ejemplo, boletines informativos.
    00:00:28
    ¿Cómo decide Outlook qué es Focused?
    00:00:32
    La bandeja de entrada enfocada estudia el
    00:00:33
    historial de su correo electrónico utilizado,
    00:00:35
    Teniendo en cuenta los tipos
    00:00:37
    de los mensajes que recibes,
    00:00:38
    el contenido de esos mensajes,
    00:00:39
    y los usuarios con los que más te comunicas.
    00:00:42
    A continuación, determina qué correos electrónicos
    00:00:44
    es más probable que lean y respondan a
    00:00:47
    y los coloca en una lista centralizada.
    00:00:49
    Si no está satisfecho con
    00:00:51
    la función Bandeja de entrada prioritaria,
    00:00:53
    Puedes desactivarlo fácilmente
    00:00:54
    desde Outlook Web App.
    00:00:56
    Sólo tienes que ir a los ajustes.
    00:00:59
    Ahora averigüemos cómo filtrar y
    00:01:01
    ordenar mensajes en el trabajo de Outlook Online,
    00:01:03
    empezando por los filtros.
    00:01:05
    Un filtro de vista implica la definición de elementos
    00:01:07
    quieres aparecer en un
    00:01:10
    para mostrar solo los elementos que
    00:01:12
    cumplir con las condiciones que especifique.
    00:01:14
    Por ejemplo
    00:01:15
    Al buscar un
    00:01:17
    mensaje o grupo de mensajes
    00:01:19
    dentro de una carpeta como Bandeja de entrada,
    00:01:21
    Elementos enviados, carpeta personal, etc.
    00:01:24
    Outlook Web App posee una serie de
    00:01:27
    de filtros predefinidos disponibles para su uso.
    00:01:29
    Simplemente haga clic en el botón Filtro en el
    00:01:31
    esquina superior derecha del panel de mensajes,
    00:01:33
    A continuación, aplique una de esas opciones.
    00:01:35
    Todo muestra todos los mensajes
    00:01:38
    sin filtros aplicados.
    00:01:39
    Los mensajes no leídos muestran
    00:01:41
    que están marcados como no leídos,
    00:01:43
    Mensajes marcados
    00:01:45
    que contiene una bandera para el seguimiento,
    00:01:47
    revisión, etc.
    00:01:48
    Para mí muestra los mensajes enviados a
    00:01:52
    o copiados al usuario como archivos.
    00:01:55
    Mostrar mensajes con archivos adjuntos.
    00:01:59
    Me menciona muestra mensajes que llaman a
    00:02:01
    específicamente su atención en un
    00:02:04
    tarea o tema particular con el símbolo arroba.
    00:02:07
    Ahora pasemos a la clasificación.
    00:02:09
    La clasificación implica reorganizar el
    00:02:10
    Visualización de elementos en el panel de mensajes.
    00:02:12
    De forma predeterminada,
    00:02:13
    Los mensajes en cualquier carpeta se organizan
    00:02:15
    por fecha en orden descendente.
    00:02:17
    Esto significa que el mensaje más reciente
    00:02:19
    se muestra en la parte superior.
    00:02:20
    Outlook Online proporciona varios tipos de
    00:02:22
    opciones para organizar la visualización de los mensajes.
    00:02:25
    Simplemente haga clic en el botón Filtro en el
    00:02:27
    esquina superior derecha del panel de mensajes,
    00:02:29
    A continuación, ordenar.
    00:02:30
    También tienes la posibilidad de
    00:02:32
    para ordenar tus correos electrónicos por fecha.
    00:02:34
    Esta es la vista predeterminada en Outlook Online.
    00:02:37
    Ordenar por mensajes de grupos
    00:02:40
    recibido del mismo usuario.
    00:02:43
    También puedes ordenar tus mensajes por tamaño,
    00:02:47
    importante o sujeto,
    00:02:48
    y los mensajes sin línea de asunto
    00:02:52
    aparecen en 1º y luego alfabéticamente.
    00:02:55
    Ahora no olvides ordenar por fecha de nuevo para
    00:02:57
    Muestra los mensajes más recientes en la parte superior.

    No elements match your search in this video....
    Do another search or back to content !


    00:00:00
    Lorsque vous recevez beaucoup d’e-mails,
    00:00:04
    Outlook vous offre quelques
    00:00:05
    Façons de trier et de filtrer votre boîte de réception.
    00:00:08
    L’application Web Outlook possède un certain nombre de
    00:00:10
    de filtres prédéfinis disponibles à l’utilisation.
    00:00:13
    La boîte de réception ciblée sépare votre Outlook
    00:00:15
    boîte de réception en deux onglets, Ciblé et Autre.
    00:00:18
    Votre e-mail le plus important
    00:00:20
    les messages se trouvent dans l’onglet Focus,
    00:00:22
    tandis que le reste reste facilement accessible
    00:00:24
    mais à l’écart sur l’autre balise.
    00:00:27
    Par exemple, les bulletins d’information.
    00:00:28
    Comment Outlook décide-t-il de ce qui est ciblé ?
    00:00:32
    Boîte de réception ciblée étudie le
    00:00:33
    l’historique de votre e-mail utilisé,
    00:00:35
    en tenant compte des types
    00:00:37
    des messages que vous recevez,
    00:00:38
    le contenu de ces messages,
    00:00:39
    et les utilisateurs avec lesquels vous communiquez le plus.
    00:00:42
    Il détermine ensuite les e-mails que vous
    00:00:44
    sont les plus susceptibles de lire et d’y répondre
    00:00:47
    et les place sur une liste centralisée.
    00:00:49
    Si vous n’êtes pas satisfait de
    00:00:51
    la fonctionnalité Boîte de réception ciblée,
    00:00:53
    vous pouvez facilement le désactiver
    00:00:54
    à partir d’Outlook Web App.
    00:00:56
    Il suffit d’aller dans les paramètres.
    00:00:59
    Voyons maintenant comment le filtrage et la
    00:01:01
    tri des messages dans le travail Outlook Online,
    00:01:03
    À commencer par les filtres.
    00:01:05
    Un filtre d’affichage implique la définition d’éléments
    00:01:07
    que vous souhaitez voir apparaître dans un
    00:01:10
    view pour n’afficher que les éléments qui
    00:01:12
    remplir les conditions que vous spécifiez.
    00:01:14
    Par exemple
    00:01:15
    lors de la recherche d’un
    00:01:17
    Message ou groupe de messages
    00:01:19
    au sein d’un dossier tel que Boîte de réception,
    00:01:21
    Éléments envoyés, dossier personnel, etc.
    00:01:24
    l’application Web Outlook possède un certain nombre de
    00:01:27
    de filtres prédéfinis disponibles à l’utilisation.
    00:01:29
    Il suffit de cliquer sur le bouton Filtrer dans le
    00:01:31
    dans le coin supérieur droit de votre volet de message,
    00:01:33
    Appliquez ensuite l’une de ces options.
    00:01:35
    Tout affiche tous les messages
    00:01:38
    sans filtres appliqués.
    00:01:39
    Non lu affiche les messages
    00:01:41
    qui sont marqués comme non lus,
    00:01:43
    Signalés affiche des messages
    00:01:45
    contenant un indicateur pour le suivi,
    00:01:47
    examen, etc.
    00:01:48
    Pour moi, affiche les messages envoyés à
    00:01:52
    ou copiés à l’utilisateur sous forme de fichiers.
    00:01:55
    Affichez les messages avec les fichiers joints.
    00:01:59
    Me mentionner affiche les messages appelant
    00:02:01
    plus particulièrement votre attention sur un
    00:02:04
    tâche ou sujet particulier avec le symbole arobase.
    00:02:07
    Passons maintenant au tri.
    00:02:09
    Le tri consiste à réorganiser les fichiers
    00:02:10
    Affichage des éléments dans le volet Message.
    00:02:12
    Par défaut
    00:02:13
    Les messages dans n’importe quel dossier sont organisés
    00:02:15
    par date dans l’ordre décroissant.
    00:02:17
    Cela signifie que le message le plus récent
    00:02:19
    s’affiche en haut.
    00:02:20
    Outlook Online fournit plusieurs tris
    00:02:22
    options permettant d’organiser l’affichage des messages.
    00:02:25
    Il suffit de cliquer sur le bouton Filtrer dans le
    00:02:27
    dans le coin supérieur droit de votre volet de message,
    00:02:29
    puis triez.
    00:02:30
    Vous avez également la possibilité
    00:02:32
    pour trier vos e-mails par date.
    00:02:34
    Il s’agit de l’affichage par défaut dans Outlook Online.
    00:02:37
    Tri par messages de groupes
    00:02:40
    reçus du même utilisateur.
    00:02:43
    Vous pouvez également trier vos messages par taille,
    00:02:47
    important ou sujet,
    00:02:48
    et les messages sans ligne d’objet
    00:02:52
    apparaissent en 1er, puis par ordre alphabétique.
    00:02:55
    Maintenant, n’oubliez pas de trier à nouveau par date pour
    00:02:57
    Affichez les messages les plus récents en haut.

    No elements match your search in this video....
    Do another search or back to content !


    00:00:00
    जब आपके पास बहुत सारे ईमेल आते हैं,
    00:00:04
    आउटलुक आपको कुछ अलग देता है
    00:00:05
    अपने इनबॉक्स को सॉर्ट और फ़िल्टर करने के तरीके.
    00:00:08
    Outlook Web App में एक संख्या होती है
    00:00:10
    उपयोग के लिए उपलब्ध पूर्वनिर्धारित फिल्टर की।
    00:00:13
    फ़ोकस किया गया इनबॉक्स आपके Outlook को अलग करता है
    00:00:15
    दो टैब में इनबॉक्स, फोकस्ड और अन्य।
    00:00:18
    आपका सबसे महत्वपूर्ण ई-मेल
    00:00:20
    संदेश फ़ोकस टैब पर हैं,
    00:00:22
    जबकि बाकी आसानी से सुलभ रहते हैं
    00:00:24
    लेकिन दूसरे टैग पर रास्ते से बाहर।
    00:00:27
    उदाहरण के लिए, समाचार पत्र।
    00:00:28
    आउटलुक कैसे तय करता है कि फोकस्ड क्या है?
    00:00:32
    फोकस्ड इनबॉक्स अध्ययन करता है
    00:00:33
    आपके ई-मेल का उपयोग किया गया इतिहास,
    00:00:35
    प्रकारों को ध्यान में रखते हुए
    00:00:37
    आपको प्राप्त संदेशों की,
    00:00:38
    उन संदेशों की सामग्री,
    00:00:39
    और जिन उपयोगकर्ताओं के साथ आप सबसे अधिक संवाद करते हैं।
    00:00:42
    यह तब निर्धारित करता है कि आप कौन से ईमेल करते हैं
    00:00:44
    पढ़ने और जवाब देने की सबसे अधिक संभावना है
    00:00:47
    और उन्हें एक केंद्रीकृत सूची में रखता है।
    00:00:49
    यदि आप इससे संतुष्ट नहीं हैं
    00:00:51
    फोकस्ड इनबॉक्स सुविधा,
    00:00:53
    आप इसे आसानी से अक्षम कर सकते हैं
    00:00:54
    Outlook Web App से.
    00:00:56
    बस सेटिंग्स में जाएं।
    00:00:59
    अब आइए जानें कि कैसे फ़िल्टरिंग और
    00:01:01
    Outlook Online कार्य में संदेशों को सॉर्ट करना,
    00:01:03
    फिल्टर से शुरू।
    00:01:05
    एक दृश्य फ़िल्टर में आइटम परिभाषित करना शामिल है
    00:01:07
    आप किसी विशेष में प्रकट होना चाहते हैं
    00:01:10
    केवल उन आइटम्स को प्रदर्शित करने के लिए देखें जो
    00:01:12
    आपके द्वारा निर्दिष्ट शर्तों को पूरा करें।
    00:01:14
    उदाहरणार्थ
    00:01:15
    किसी विशेष के लिए खोज करते समय
    00:01:17
    संदेश या संदेशों का समूह
    00:01:19
    इनबॉक्स जैसे फ़ोल्डर में,
    00:01:21
    भेजे गए आइटम, व्यक्तिगत फ़ोल्डर, आदि,
    00:01:24
    Outlook Web App में एक संख्या होती है
    00:01:27
    उपयोग के लिए उपलब्ध पूर्वनिर्धारित फिल्टर की।
    00:01:29
    बस में फ़िल्टर बटन पर क्लिक करें
    00:01:31
    आपके संदेश फलक के ऊपरी दाएँ कोने में,
    00:01:33
    फिर उन विकल्पों में से एक को लागू करें।
    00:01:35
    सभी सभी संदेश प्रदर्शित करता है
    00:01:38
    फिल्टर लागू किए बिना।
    00:01:39
    अपठित संदेश प्रदर्शित करता है
    00:01:41
    जिन्हें अपठित के रूप में चिह्नित किया गया है,
    00:01:43
    ध्वजांकित संदेश प्रदर्शित करता है
    00:01:45
    अनुवर्ती कार्रवाई के लिए एक ध्वज युक्त,
    00:01:47
    समीक्षा, आदि।
    00:01:48
    मेरे लिए भेजे गए संदेश प्रदर्शित करता है
    00:01:52
    या उपयोगकर्ता को फ़ाइलों के रूप में कॉपी किया गया।
    00:01:55
    अनुलग्न फ़ाइलों के साथ संदेश प्रदर्शित करें.
    00:01:59
    उल्लेख मुझे कॉल करने वाले संदेश प्रदर्शित करता है
    00:02:01
    विशेष रूप से एक पर आपका ध्यान
    00:02:04
    एटी प्रतीक के साथ विशेष कार्य या विषय।
    00:02:07
    अब छँटाई पर चलते हैं।
    00:02:09
    छँटाई में पुनर्व्यवस्थित करना शामिल है
    00:02:10
    संदेश फलक में आइटम्स का प्रदर्शन.
    00:02:12
    डिफ़ॉल्ट रूप से,
    00:02:13
    किसी भी फ़ोल्डर में संदेश व्यवस्थित हैं
    00:02:15
    अवरोही क्रम में तारीख से।
    00:02:17
    इसका मतलब है कि नवीनतम संदेश
    00:02:19
    शीर्ष पर प्रदर्शित होता है।
    00:02:20
    Outlook Online कई प्रकार प्रदान करता है
    00:02:22
    संदेशों के प्रदर्शन को व्यवस्थित करने के विकल्प।
    00:02:25
    बस में फ़िल्टर बटन पर क्लिक करें
    00:02:27
    आपके संदेश फलक के ऊपरी दाएँ कोने में,
    00:02:29
    फिर सॉर्ट करें।
    00:02:30
    आपके पास भी संभावना है
    00:02:32
    अपने ईमेल को तिथि के अनुसार क्रमबद्ध करने के लिए।
    00:02:34
    यह Outlook Online में डिफ़ॉल्ट दृश्य है.
    00:02:37
    समूह संदेशों से क्रमबद्ध करना
    00:02:40
    एक ही उपयोगकर्ता से प्राप्त किया गया।
    00:02:43
    आप अपने संदेशों को आकार के अनुसार भी क्रमबद्ध कर सकते हैं,
    00:02:47
    महत्वपूर्ण या विषय,
    00:02:48
    और बिना विषय पंक्ति वाले संदेश
    00:02:52
    1st और फिर वर्णानुक्रम में दिखाई देते हैं।
    00:02:55
    अब फिर से तारीख के अनुसार सॉर्ट करना न भूलें
    00:02:57
    शीर्ष पर नवीनतम संदेश प्रदर्शित करें।

    No elements match your search in this video....
    Do another search or back to content !


    00:00:00
    Ketika Anda memiliki banyak email masuk,
    00:00:04
    Outlook memberi Anda beberapa hal berbeda
    00:00:05
    Cara untuk mengurutkan dan memfilter kotak masuk Anda.
    00:00:08
    Outlook Web App memiliki nomor
    00:00:10
    filter standar yang tersedia untuk digunakan.
    00:00:13
    Kotak Masuk Prioritas memisahkan Outlook Anda
    00:00:15
    kotak masuk menjadi dua tab, Terfokus dan Lainnya.
    00:00:18
    E-mail Anda yang paling penting
    00:00:20
    pesan ada di tab Fokus,
    00:00:22
    sementara sisanya tetap mudah diakses
    00:00:24
    tapi keluar dari jalan di tag lain.
    00:00:27
    Misalnya, buletin.
    00:00:28
    Bagaimana Outlook memutuskan apa yang difokuskan?
    00:00:32
    Kotak Masuk Terfokus mempelajari
    00:00:33
    riwayat e-mail Anda yang digunakan,
    00:00:35
    dengan mempertimbangkan jenisnya
    00:00:37
    pesan yang Anda terima,
    00:00:38
    isi dari pesan-pesan itu,
    00:00:39
    dan pengguna yang paling sering berkomunikasi dengan Anda.
    00:00:42
    Kemudian menentukan email mana yang Anda
    00:00:44
    kemungkinan besar akan membaca dan merespons
    00:00:47
    dan menempatkannya pada daftar terpusat.
    00:00:49
    Jika Anda tidak puas dengan
    00:00:51
    fitur Kotak Masuk Prioritas,
    00:00:53
    Anda dapat dengan mudah menonaktifkannya
    00:00:54
    dari Outlook Web App.
    00:00:56
    Cukup buka pengaturan.
    00:00:59
    Sekarang mari kita cari tahu bagaimana penyaringan dan
    00:01:01
    menyortir pesan di Outlook Online berfungsi,
    00:01:03
    dimulai dengan filter.
    00:01:05
    Filter tampilan melibatkan mendefinisikan item
    00:01:07
    Anda ingin muncul dalam tertentu
    00:01:10
    tampilan untuk menampilkan hanya item yang
    00:01:12
    memenuhi ketentuan yang Anda tentukan.
    00:01:14
    Misalnya
    00:01:15
    Saat mencari yang tertentu
    00:01:17
    Pesan atau grup pesan
    00:01:19
    dalam folder seperti Kotak Masuk,
    00:01:21
    Item Terkirim, Folder Pribadi, dll,
    00:01:24
    Outlook Web App memiliki nomor
    00:01:27
    filter standar yang tersedia untuk digunakan.
    00:01:29
    Cukup klik tombol SARING di
    00:01:31
    sudut kanan atas panel pesan Anda,
    00:01:33
    Kemudian terapkan salah satu opsi tersebut.
    00:01:35
    Semua menampilkan semua pesan
    00:01:38
    tanpa filter yang diterapkan.
    00:01:39
    Belum dibaca menampilkan pesan
    00:01:41
    yang ditandai sebagai belum dibaca,
    00:01:43
    Ditandai menampilkan pesan
    00:01:45
    berisi bendera untuk tindak lanjut,
    00:01:47
    ulasan, dll.
    00:01:48
    To me menampilkan pesan yang dikirim ke
    00:01:52
    atau disalin ke pengguna sebagai file.
    00:01:55
    Menampilkan pesan dengan file lampiran.
    00:01:59
    Menyebut saya menampilkan pesan panggilan
    00:02:01
    khususnya perhatian Anda pada
    00:02:04
    tugas atau topik tertentu dengan simbol at.
    00:02:07
    Sekarang mari kita beralih ke penyortiran.
    00:02:09
    Penyortiran melibatkan penataan ulang
    00:02:10
    Tampilan item di panel pesan.
    00:02:12
    Secara default,
    00:02:13
    Pesan dalam folder apa pun diatur
    00:02:15
    berdasarkan tanggal dalam urutan menurun.
    00:02:17
    Ini berarti pesan terbaru
    00:02:19
    ditampilkan di atas.
    00:02:20
    Outlook Online menyediakan beberapa jenis
    00:02:22
    opsi untuk mengatur tampilan pesan.
    00:02:25
    Cukup klik tombol SARING di
    00:02:27
    sudut kanan atas panel pesan Anda,
    00:02:29
    lalu urutkan.
    00:02:30
    Anda juga memiliki kemungkinan
    00:02:32
    untuk mengurutkan email menurut tanggal.
    00:02:34
    Ini adalah tampilan default di Outlook Online.
    00:02:37
    Mengurutkan berdasarkan dari pesan grup
    00:02:40
    diterima dari pengguna yang sama.
    00:02:43
    Anda juga dapat mengurutkan pesan Anda berdasarkan ukuran,
    00:02:47
    penting atau subjek,
    00:02:48
    dan pesan tanpa baris subjek akan
    00:02:52
    muncul 1 dan kemudian abjad.
    00:02:55
    Sekarang jangan lupa urutkan berdasarkan tanggal lagi untuk
    00:02:57
    Tampilkan pesan terbaru di atas.

    No elements match your search in this video....
    Do another search or back to content !


    00:00:00
    Quando ricevi molte e-mail,
    00:00:04
    Outlook ti offre alcuni diversi
    00:00:05
    Modi per ordinare e filtrare la posta in arrivo.
    00:00:08
    Outlook Web App possiede un numero di
    00:00:10
    di filtri predefiniti disponibili per l'uso.
    00:00:13
    La Posta in arrivo evidenziata separa Outlook
    00:00:15
    Posta in arrivo in due schede, Focalizzato e Altro.
    00:00:18
    La tua e-mail più importante
    00:00:20
    i messaggi si trovano nella scheda Focus,
    00:00:22
    mentre il resto rimane facilmente accessibile
    00:00:24
    ma tolto di mezzo sull'altro tag.
    00:00:27
    Ad esempio, le newsletter.
    00:00:28
    In che modo Outlook decide cosa è Focused?
    00:00:32
    Focused Inbox studia il
    00:00:33
    cronologia dell'e-mail utilizzata,
    00:00:35
    tenendo conto dei tipi di
    00:00:37
    dei messaggi che ricevi,
    00:00:38
    il contenuto di tali messaggi,
    00:00:39
    e gli utenti con cui comunichi di più.
    00:00:42
    Determina quindi quali e-mail si desidera
    00:00:44
    sono più propensi a leggere e rispondere a
    00:00:47
    e li inserisce in un elenco centralizzato.
    00:00:49
    Se non sei soddisfatto di
    00:00:51
    la funzione Posta in arrivo evidenziata,
    00:00:53
    puoi disabilitarlo facilmente
    00:00:54
    da Outlook Web App.
    00:00:56
    Basta andare alle impostazioni.
    00:00:59
    Scopriamo ora come filtrare e
    00:01:01
    l'ordinamento dei messaggi nel lavoro di Outlook Online,
    00:01:03
    A partire dai filtri.
    00:01:05
    Un filtro di visualizzazione comporta la definizione di elementi
    00:01:07
    vuoi apparire in un particolare
    00:01:10
    per visualizzare solo gli elementi che
    00:01:12
    soddisfano le condizioni specificate.
    00:01:14
    Per esempio
    00:01:15
    durante la ricerca di un particolare
    00:01:17
    messaggio o gruppo di messaggi
    00:01:19
    all'interno di una cartella come Posta in arrivo,
    00:01:21
    Posta inviata, cartella personale, ecc.,
    00:01:24
    Outlook Web App possiede un numero di
    00:01:27
    di filtri predefiniti disponibili per l'uso.
    00:01:29
    Basta fare clic sul pulsante Filtro nella finestra di dialogo
    00:01:31
    nell'angolo in alto a destra del riquadro dei messaggi,
    00:01:33
    quindi applicare una di queste opzioni.
    00:01:35
    Tutto visualizza tutti i messaggi
    00:01:38
    senza filtri applicati.
    00:01:39
    Non letti visualizza i messaggi
    00:01:41
    che sono contrassegnati come non letti,
    00:01:43
    Contrassegnato visualizza i messaggi
    00:01:45
    contenente un flag per il follow-up,
    00:01:47
    revisione, ecc.
    00:01:48
    Visualizza i messaggi inviati a
    00:01:52
    o copiati nell'utente come file.
    00:01:55
    Visualizza i messaggi con i file allegati.
    00:01:59
    Mi menziona visualizza i messaggi di chiamata
    00:02:01
    in particolare la tua attenzione su un
    00:02:04
    particolare attività o argomento con il simbolo at.
    00:02:07
    Passiamo ora all'ordinamento.
    00:02:09
    L'ordinamento comporta la riorganizzazione del
    00:02:10
    Visualizzazione degli elementi nel riquadro dei messaggi.
    00:02:12
    Per impostazione predefinita,
    00:02:13
    I messaggi in qualsiasi cartella sono disposti
    00:02:15
    per data in ordine decrescente.
    00:02:17
    Ciò significa che il messaggio più recente
    00:02:19
    viene visualizzato in alto.
    00:02:20
    Outlook Online offre diversi tipi di
    00:02:22
    opzioni per organizzare la visualizzazione dei messaggi.
    00:02:25
    Basta fare clic sul pulsante Filtro nella finestra di dialogo
    00:02:27
    nell'angolo in alto a destra del riquadro dei messaggi,
    00:02:29
    quindi ordinare.
    00:02:30
    Hai anche la possibilità di
    00:02:32
    per ordinare le tue e-mail per data.
    00:02:34
    Questa è la visualizzazione predefinita in Outlook Online.
    00:02:37
    Ordinamento in base ai messaggi dei gruppi
    00:02:40
    ricevuto dallo stesso utente.
    00:02:43
    Puoi anche ordinare i tuoi messaggi per dimensione,
    00:02:47
    importante o soggetto,
    00:02:48
    e i messaggi senza oggetto lo faranno
    00:02:52
    appaiono 1 e poi in ordine alfabetico.
    00:02:55
    Ora non dimenticare di nuovo l'ordinamento per data per
    00:02:57
    Visualizza i messaggi più recenti in alto.

    No elements match your search in this video....
    Do another search or back to content !


    00:00:00
    メールがたくさん入ってくると、
    00:00:04
    Outlookは、いくつかの異なるものを提供します
    00:00:05
    受信トレイを並べ替えてフィルタリングする方法。
    00:00:08
    Outlook Web App には、
    00:00:10
    使用可能な定義済みフィルターの数。
    00:00:13
    優先受信トレイは Outlook を分離します
    00:00:15
    inbox を [Focused (優先)] と [Other (その他)] の 2 つのタブに分割します。
    00:00:18
    最も重要な電子メール
    00:00:20
    メッセージは [フォーカス] タブにあります。
    00:00:22
    残りは簡単にアクセスできますが、
    00:00:24
    しかし、他のタグの邪魔になりません。
    00:00:27
    例えば、ニュースレターです。
    00:00:28
    Outlook では、フォーカスの対象はどのように決定されますか?
    00:00:32
    焦点を絞った受信トレイは、
    00:00:33
    使用された電子メールの履歴、
    00:00:35
    タイプを考慮に入れる
    00:00:37
    受信したメッセージの数、
    00:00:38
    それらのメッセージの内容、
    00:00:39
    そして、最もコミュニケーションをとるユーザー。
    00:00:42
    次に、どのメールを送信するかを決定します
    00:00:44
    読んで返信する可能性が最も高い
    00:00:47
    そして、それらを一元化されたリストに配置します。
    00:00:49
    ご満足いただけない場合
    00:00:51
    優先受信トレイ機能、
    00:00:53
    簡単に無効にすることができます
    00:00:54
    Outlook Web App から。
    00:00:56
    設定に移動するだけです。
    00:00:59
    それでは、フィルタリングと
    00:01:01
    Outlook Online の作業でメッセージを並べ替える、
    00:01:03
    フィルターから始めます。
    00:01:05
    ビュー フィルターには、アイテムの定義が含まれます
    00:01:07
    特定の
    00:01:10
    viewは、次の項目のみを表示します。
    00:01:12
    指定した条件を満たします。
    00:01:14
    例えば
    00:01:15
    特定の
    00:01:17
    メッセージまたはメッセージのグループ
    00:01:19
    Inbox などのフォルダー内では、
    00:01:21
    送信済みアイテム、個人フォルダなど
    00:01:24
    Outlook Web App には番号があります
    00:01:27
    使用可能な定義済みフィルターの数。
    00:01:29
    の[フィルター]ボタンをクリックするだけです
    00:01:31
    メッセージペインの右上隅
    00:01:33
    次に、これらのオプションのいずれかを適用します。
    00:01:35
    [すべて] は、すべてのメッセージを表示します
    00:01:38
    フィルターは適用されません。
    00:01:39
    未読はメッセージを表示します
    00:01:41
    未読としてマークされているもの、
    00:01:43
    フラグ付きはメッセージを表示します
    00:01:45
    フォローアップ用のフラグを含む
    00:01:47
    レビューなど
    00:01:48
    [自分宛] には、送信先のメッセージが表示されます。
    00:01:52
    またはファイルとしてユーザーにコピーされます。
    00:01:55
    添付ファイル付きのメッセージを表示します。
    00:01:59
    Mentions me を呼び出すメッセージを表示します。
    00:02:01
    具体的には、
    00:02:04
    特定のタスクまたはトピックをアットマークで囲みます。
    00:02:07
    それでは、並べ替えに移りましょう。
    00:02:09
    並べ替えには、
    00:02:10
    メッセージペイン内の項目の表示。
    00:02:12
    デフォルトでは、
    00:02:13
    任意のフォルダ内のメッセージが配置されます
    00:02:15
    日付の降順。
    00:02:17
    これは、最新のメッセージを意味します
    00:02:19
    が一番上に表示されます。
    00:02:20
    Outlook Online には、いくつかの並べ替え機能が用意されています
    00:02:22
    メッセージの表示をアレンジするオプション。
    00:02:25
    の[フィルター]ボタンをクリックするだけです
    00:02:27
    メッセージペインの右上隅
    00:02:29
    次にソートします。
    00:02:30
    あなたも可能性を秘めています
    00:02:32
    をクリックして、メールを日付順に並べ替えます。
    00:02:34
    これは、Outlook Online の既定のビューです。
    00:02:37
    グループメッセージからの並べ替え
    00:02:40
    同じユーザーから受信しました。
    00:02:43
    メッセージをサイズで並べ替えることもできます。
    00:02:47
    重要または主題、
    00:02:48
    また、件名のないメッセージは
    00:02:52
    1番目からアルファベット順に表示されます。
    00:02:55
    ここで、もう一度日付で並べ替えることを忘れないでください
    00:02:57
    最新のメッセージを一番上に表示します。

    No elements match your search in this video....
    Do another search or back to content !


    00:00:00
    Als er veel e-mails binnenkomen,
    00:00:04
    Outlook biedt u een paar verschillende
    00:00:05
    Manieren om je inbox te sorteren en te filteren.
    00:00:08
    De Outlook Web App beschikt over een aantal
    00:00:10
    van vooraf gedefinieerde filters die beschikbaar zijn voor gebruik.
    00:00:13
    Postvak IN met prioriteit scheidt uw Outlook
    00:00:15
    Postvak IN in twee tabbladen, met prioriteit en Overig.
    00:00:18
    Je belangrijkste e-mail
    00:00:20
    berichten staan op het tabblad Focus,
    00:00:22
    terwijl de rest gemakkelijk bereikbaar blijft
    00:00:24
    maar uit de weg op de andere tag.
    00:00:27
    Bijvoorbeeld nieuwsbrieven.
    00:00:28
    Hoe bepaalt Outlook wat Gefocust is?
    00:00:32
    Postvak IN met prioriteit bestudeert de
    00:00:33
    geschiedenis van uw gebruikte e-mail,
    00:00:35
    rekening houdend met de soorten
    00:00:37
    van de berichten die u ontvangt,
    00:00:38
    de inhoud van die berichten,
    00:00:39
    en de gebruikers met wie u het meest communiceert.
    00:00:42
    Het bepaalt vervolgens welke e-mails u
    00:00:44
    zijn het meest waarschijnlijk om te lezen en te reageren op
    00:00:47
    en plaatst ze op een gecentraliseerde lijst.
    00:00:49
    Als u niet tevreden bent met
    00:00:51
    de functie Postvak IN met prioriteit,
    00:00:53
    je kunt het eenvoudig uitschakelen
    00:00:54
    van de Outlook Web App.
    00:00:56
    Ga gewoon naar instellingen.
    00:00:59
    Laten we nu eens kijken hoe filteren en
    00:01:01
    berichten sorteren in Outlook Online-werk,
    00:01:03
    Te beginnen met filters.
    00:01:05
    Een weergavefilter omvat het definiëren van items
    00:01:07
    u in een bepaalde
    00:01:10
    weergeven om alleen items weer te geven die
    00:01:12
    voldoen aan de voorwaarden die u opgeeft.
    00:01:14
    Bijvoorbeeld
    00:01:15
    bij het zoeken naar een bepaalde
    00:01:17
    Bericht of groep berichten
    00:01:19
    in een map zoals Postvak IN,
    00:01:21
    Verzonden items, persoonlijke map, enz.,
    00:01:24
    de Outlook Web App beschikt over een aantal
    00:01:27
    van vooraf gedefinieerde filters die beschikbaar zijn voor gebruik.
    00:01:29
    Klik gewoon op de knop Filter in het
    00:01:31
    rechterbovenhoek van uw berichtvenster,
    00:01:33
    Pas vervolgens een van deze opties toe.
    00:01:35
    Alle geeft alle berichten weer
    00:01:38
    zonder toegepaste filters.
    00:01:39
    Ongelezen geeft berichten weer
    00:01:41
    die als ongelezen zijn gemarkeerd,
    00:01:43
    Gemarkeerd geeft berichten weer
    00:01:45
    met een markering voor follow-up,
    00:01:47
    recensie, enz.
    00:01:48
    To me geeft berichten weer die zijn verzonden naar
    00:01:52
    of als bestanden naar de gebruiker worden gekopieerd.
    00:01:55
    Berichten met bijgevoegde bestanden weergeven.
    00:01:59
    Vermeldt mij geeft berichten weer die bellen
    00:02:01
    met name uw aandacht voor een
    00:02:04
    bepaalde taak of onderwerp met het AT-symbool.
    00:02:07
    Laten we nu verder gaan met sorteren.
    00:02:09
    Sorteren omvat het herschikken van de
    00:02:10
    Weergave van items in het berichtenvenster.
    00:02:12
    Standaard
    00:02:13
    Berichten in een willekeurige map worden gerangschikt
    00:02:15
    op datum in aflopende volgorde.
    00:02:17
    Dit betekent dat het nieuwste bericht
    00:02:19
    wordt bovenaan weergegeven.
    00:02:20
    Outlook Online biedt verschillende soorten
    00:02:22
    opties om de weergave van berichten te regelen.
    00:02:25
    Klik gewoon op de knop Filter in het
    00:02:27
    rechterbovenhoek van uw berichtvenster,
    00:02:29
    Sorteer dan.
    00:02:30
    Je hebt ook de mogelijkheid
    00:02:32
    om uw e-mails te sorteren op datum.
    00:02:34
    Dit is de standaardweergave in Outlook Online.
    00:02:37
    Sorteren op berichten van groepen
    00:02:40
    ontvangen van dezelfde gebruiker.
    00:02:43
    U kunt uw berichten ook sorteren op grootte,
    00:02:47
    belangrijk of onderwerp,
    00:02:48
    en berichten zonder onderwerpregel
    00:02:52
    verschijnen 1e en dan alfabetisch.
    00:02:55
    Vergeet nu niet meer te sorteren op datum om
    00:02:57
    Geef de meest recente berichten bovenaan weer.

    No elements match your search in this video....
    Do another search or back to content !


    00:00:00
    Kiedy przychodzi dużo e-maili,
    00:00:04
    Outlook oferuje kilka różnych
    00:00:05
    sposoby sortowania i filtrowania skrzynki odbiorczej.
    00:00:08
    Aplikacja Outlook Web App posiada numer
    00:00:10
    predefiniowanych filtrów dostępnych do użycia.
    00:00:13
    Priorytetowa skrzynka odbiorcza oddziela program Outlook
    00:00:15
    skrzynkę odbiorczą na dwie karty, Priorytetowe i Inne.
    00:00:18
    Twój najważniejszy adres e-mail
    00:00:20
    wiadomości znajdują się na karcie Focus,
    00:00:22
    podczas gdy reszta pozostaje łatwo dostępna
    00:00:24
    ale na uboczu na drugim tagu.
    00:00:27
    Na przykład newslettery.
    00:00:28
    W jaki sposób program Outlook decyduje, co jest skoncentrowane?
    00:00:32
    Skoncentrowana skrzynka odbiorcza bada
    00:00:33
    historia wykorzystanego adresu e-mail,
    00:00:35
    Biorąc pod uwagę rodzaje
    00:00:37
    wiadomości, które otrzymujesz,
    00:00:38
    treść tych wiadomości,
    00:00:39
    i użytkowników, z którymi komunikujesz się najczęściej.
    00:00:42
    Następnie określa, które e-maile
    00:00:44
    są najbardziej skłonni do czytania i odpowiadania na
    00:00:47
    i umieszcza je na scentralizowanej liście.
    00:00:49
    Jeśli nie jesteś zadowolony z
    00:00:51
    funkcja Priorytetowa skrzynka odbiorcza,
    00:00:53
    Możesz go łatwo wyłączyć
    00:00:54
    z poziomu aplikacji Outlook Web App.
    00:00:56
    Po prostu przejdź do ustawień.
    00:00:59
    Teraz dowiedzmy się, jak filtrowanie i
    00:01:01
    sortowanie wiadomości w pracy Outlook Online,
    00:01:03
    Zaczynając od filtrów.
    00:01:05
    Filtr widoku polega na definiowaniu elementów
    00:01:07
    chcesz pojawić się w konkretnym
    00:01:10
    , aby wyświetlić tylko te elementy, które
    00:01:12
    spełniają określone przez Ciebie warunki.
    00:01:14
    Na przykład
    00:01:15
    podczas wyszukiwania konkretnego
    00:01:17
    wiadomość lub grupa wiadomości
    00:01:19
    w folderze, takim jak Skrzynka odbiorcza,
    00:01:21
    Wysłane przedmioty, folder osobisty itp.,
    00:01:24
    aplikacja Outlook Web App posiada numer
    00:01:27
    predefiniowanych filtrów dostępnych do użycia.
    00:01:29
    Wystarczy kliknąć przycisk Filtruj w
    00:01:31
    prawy górny róg okienka wiadomości,
    00:01:33
    Następnie zastosuj jedną z tych opcji.
    00:01:35
    Wszystkie wyświetla wszystkie wiadomości
    00:01:38
    bez zastosowanych filtrów.
    00:01:39
    Nieprzeczytane wyświetla komunikaty
    00:01:41
    które są oznaczone jako nieprzeczytane,
    00:01:43
    Oflagowane wyświetla komunikaty
    00:01:45
    zawierające zastrzeżenie dotyczące działań następczych,
    00:01:47
    przegląd itp.
    00:01:48
    Wyświetla mi wiadomości wysłane do
    00:01:52
    lub skopiowane do użytkownika jako pliki.
    00:01:55
    Wyświetlaj wiadomości z załączonymi plikami.
    00:01:59
    Wspomnienie o mnie wyświetla wiadomości dzwoniące
    00:02:01
    w szczególności uwagę poświęconą
    00:02:04
    konkretne zadanie lub temat z symbolem AT.
    00:02:07
    Przejdźmy teraz do sortowania.
    00:02:09
    Sortowanie polega na zmianie kolejności
    00:02:10
    Wyświetlanie elementów w okienku wiadomości.
    00:02:12
    Domyślnie,
    00:02:13
    Wiadomości w dowolnym folderze są uporządkowane
    00:02:15
    według daty w kolejności malejącej.
    00:02:17
    Oznacza to, że najnowsza wiadomość
    00:02:19
    jest wyświetlany na górze.
    00:02:20
    Aplikacja Outlook Online oferuje kilka rodzajów sortowania
    00:02:22
    opcje porządkowania wyświetlania komunikatów.
    00:02:25
    Wystarczy kliknąć przycisk Filtruj w
    00:02:27
    prawy górny róg okienka wiadomości,
    00:02:29
    Następnie posortuj.
    00:02:30
    Masz również możliwość
    00:02:32
    , aby posortować wiadomości e-mail według daty.
    00:02:34
    Jest to widok domyślny w aplikacji Outlook Online.
    00:02:37
    Sortowanie według wiadomości z grup
    00:02:40
    otrzymane od tego samego użytkownika.
    00:02:43
    Możesz także sortować wiadomości według rozmiaru,
    00:02:47
    ważne lub przedmiotowe,
    00:02:48
    a wiadomości bez tematu będą
    00:02:52
    pojawiają się 1., a następnie alfabetycznie.
    00:02:55
    Teraz nie zapomnij ponownie sortować według daty, aby
    00:02:57
    Wyświetlaj najnowsze wiadomości na górze.

    No elements match your search in this video....
    Do another search or back to content !


    00:00:00
    Quando você tem muitos e-mails chegando,
    00:00:04
    O Outlook dá-lhe alguns diferentes
    00:00:05
    maneiras de classificar e filtrar sua caixa de entrada.
    00:00:08
    O Outlook Web App possui um número
    00:00:10
    de filtros predefinidos disponíveis para uso.
    00:00:13
    A Caixa de Entrada Focada separa o Outlook
    00:00:15
    caixa de entrada em duas guias, Focalizado e Outro.
    00:00:18
    Seu e-mail mais importante
    00:00:20
    as mensagens estão na guia Foco,
    00:00:22
    enquanto o resto permanece facilmente acessível
    00:00:24
    mas fora do caminho na outra tag.
    00:00:27
    Por exemplo, boletins informativos.
    00:00:28
    Como o Outlook decide o que é Focado?
    00:00:32
    A caixa de entrada focada estuda o
    00:00:33
    histórico do seu e-mail utilizado,
    00:00:35
    tendo em conta os tipos
    00:00:37
    das mensagens que você recebe,
    00:00:38
    o conteúdo dessas mensagens,
    00:00:39
    e os usuários com quem você mais se comunica.
    00:00:42
    Em seguida, ele determina quais e-mails você
    00:00:44
    são mais propensos a ler e responder a
    00:00:47
    e os coloca em uma lista centralizada.
    00:00:49
    Se você não está satisfeito com
    00:00:51
    o recurso Caixa de entrada focada,
    00:00:53
    você pode facilmente desativá-lo
    00:00:54
    do Outlook Web App.
    00:00:56
    Basta ir para configurações.
    00:00:59
    Agora vamos descobrir como filtrar e
    00:01:01
    classificando mensagens no trabalho do Outlook Online,
    00:01:03
    começando pelos filtros.
    00:01:05
    Um filtro de exibição envolve a definição de itens
    00:01:07
    você deseja aparecer em um específico
    00:01:10
    modo de exibição para exibir somente itens que
    00:01:12
    atender às condições especificadas.
    00:01:14
    Por exemplo
    00:01:15
    ao procurar por um determinado
    00:01:17
    mensagem ou grupo de mensagens
    00:01:19
    dentro de uma pasta como Caixa de Entrada,
    00:01:21
    Itens Enviados, Pasta Pessoal, etc,
    00:01:24
    o Outlook Web App possui um número
    00:01:27
    de filtros predefinidos disponíveis para uso.
    00:01:29
    Basta clicar no botão Filtrar no botão
    00:01:31
    canto superior direito do painel de mensagens,
    00:01:33
    em seguida, aplique uma dessas opções.
    00:01:35
    Tudo exibe todas as mensagens
    00:01:38
    sem filtros aplicados.
    00:01:39
    Não lido exibe mensagens
    00:01:41
    que estão marcados como não lidos,
    00:01:43
    Sinalizado exibe mensagens
    00:01:45
    contendo um sinalizador para acompanhamento,
    00:01:47
    revisão, etc.
    00:01:48
    Para mim exibe mensagens enviadas para
    00:01:52
    ou copiados para o usuário como arquivos.
    00:01:55
    Exibir mensagens com arquivos anexados.
    00:01:59
    Menções me exibe mensagens chamando
    00:02:01
    especificamente sua atenção em um
    00:02:04
    tarefa ou tópico específico com o símbolo at.
    00:02:07
    Agora vamos passar para a classificação.
    00:02:09
    A classificação envolve a reorganização do
    00:02:10
    exibição de itens no painel de mensagens.
    00:02:12
    Por padrão,
    00:02:13
    As mensagens em qualquer pasta são organizadas
    00:02:15
    por data em ordem decrescente.
    00:02:17
    Isso significa a mensagem mais recente
    00:02:19
    é exibido na parte superior.
    00:02:20
    O Outlook Online fornece várias classificações
    00:02:22
    opções para organizar a exibição de mensagens.
    00:02:25
    Basta clicar no botão Filtrar no botão
    00:02:27
    canto superior direito do painel de mensagens,
    00:02:29
    em seguida, classifique.
    00:02:30
    Você também tem a possibilidade
    00:02:32
    para classificar seus e-mails por data.
    00:02:34
    Esse é o modo de exibição padrão no Outlook Online.
    00:02:37
    Classificando por mensagens de grupos
    00:02:40
    recebido do mesmo usuário.
    00:02:43
    Você também pode classificar suas mensagens por tamanho,
    00:02:47
    importante ou assunto,
    00:02:48
    e mensagens sem linha de assunto
    00:02:52
    aparecem em 1º lugar e depois em ordem alfabética.
    00:02:55
    Agora não se esqueça de classificar por data novamente para
    00:02:57
    Exiba as mensagens mais recentes na parte superior.

    No elements match your search in this video....
    Do another search or back to content !


    00:00:00
    Когда у вас много писем,
    00:00:04
    Outlook предоставляет вам несколько различных
    00:00:05
    Способы сортировки и фильтрации почтового ящика.
    00:00:08
    Outlook Web App обладает числом
    00:00:10
    предустановленных фильтров, доступных для использования.
    00:00:13
    В разделе «Входящие» в фокусе Outlook
    00:00:15
    в две вкладки: «В фокусе» и «Другое».
    00:00:18
    Ваш самый важный e-mail
    00:00:20
    сообщения находятся на вкладке Фокус,
    00:00:22
    в то время как остальные остаются легкодоступными
    00:00:24
    но в стороне на другом теге.
    00:00:27
    Например, информационные бюллетени.
    00:00:28
    Как Outlook определяет, что является Focused?
    00:00:32
    Сфокусированный почтовый ящик изучает
    00:00:33
    история использования Вашего адреса электронной почты,
    00:00:35
    С учетом типов
    00:00:37
    сообщений, которые вы получаете,
    00:00:38
    содержание этих сообщений,
    00:00:39
    и пользователи, с которыми вы общаетесь чаще всего.
    00:00:42
    Затем он определяет, какие электронные письма вы отправляете
    00:00:44
    с наибольшей вероятностью прочитают и ответят на
    00:00:47
    и помещает их в централизованный список.
    00:00:49
    Если вас не устраивает
    00:00:51
    функция «Сфокусированные входящие»,
    00:00:53
    Вы можете легко отключить его
    00:00:54
    из Outlook Web App.
    00:00:56
    Просто зайдите в настройки.
    00:00:59
    Теперь давайте узнаем, как фильтрация и
    00:01:01
    сортировка сообщений в работе Outlook Online,
    00:01:03
    Начнем с фильтров.
    00:01:05
    Фильтр представления включает в себя определение элементов
    00:01:07
    Вы хотите появиться в определенном
    00:01:10
    view, чтобы отобразить только те элементы, которые
    00:01:12
    соответствовать указанным вами условиям.
    00:01:14
    Например
    00:01:15
    при поиске конкретного
    00:01:17
    Сообщение или группа сообщений
    00:01:19
    в папке, например «Входящие»,
    00:01:21
    Отправленные элементы, личная папка и т.д.,
    00:01:24
    Outlook Web App обладает числом
    00:01:27
    предустановленных фильтров, доступных для использования.
    00:01:29
    Просто нажмите кнопку «Фильтр» в меню
    00:01:31
    верхний правый угол панели сообщений,
    00:01:33
    Затем примените один из этих вариантов.
    00:01:35
    Все отображает все сообщения
    00:01:38
    без применения фильтров.
    00:01:39
    Непрочитанные отображает сообщения
    00:01:41
    которые помечены как непрочитанные,
    00:01:43
    Помечено отображает сообщения
    00:01:45
    содержащий флаг для последующих действий,
    00:01:47
    обзор и т.д.
    00:01:48
    Отображает сообщения, отправленные на
    00:01:52
    или копируются пользователю в виде файлов.
    00:01:55
    Отображение сообщений с прикрепленными файлами.
    00:01:59
    Упоминает меня: отображает сообщения, вызывающие
    00:02:01
    В частности, ваше внимание на
    00:02:04
    конкретная задача или тема с символом AT.
    00:02:07
    Теперь перейдем к сортировке.
    00:02:09
    Сортировка включает в себя перестановку
    00:02:10
    Отображение элементов в области сообщений.
    00:02:12
    По умолчанию
    00:02:13
    Сообщения в любой папке упорядочены
    00:02:15
    по дате в порядке убывания.
    00:02:17
    Это означает, что самое новое сообщение
    00:02:19
    отображается сверху.
    00:02:20
    Outlook Online предоставляет несколько видов сортировки
    00:02:22
    Опции для организации отображения сообщений.
    00:02:25
    Просто нажмите кнопку «Фильтр» в меню
    00:02:27
    верхний правый угол панели сообщений,
    00:02:29
    Затем отсортируйте.
    00:02:30
    У вас также есть возможность
    00:02:32
    , чтобы отсортировать электронные письма по дате.
    00:02:34
    Это представление по умолчанию в Outlook Online.
    00:02:37
    Сортировка сообщений по группам
    00:02:40
    полученные от одного и того же пользователя.
    00:02:43
    Вы также можете сортировать сообщения по размеру,
    00:02:47
    важный или предметный,
    00:02:48
    и сообщения без темы
    00:02:52
    появляются 1-е, а затем в алфавитном порядке.
    00:02:55
    Теперь не забудьте снова отсортировать по дате, чтобы
    00:02:57
    Отображать самые последние сообщения сверху.

    No elements match your search in this video....
    Do another search or back to content !


    00:00:00
    Çok fazla e-posta geldiğinde,
    00:00:04
    Outlook size birkaç farklı seçenek sunar
    00:00:05
    Gelen kutunuzu sıralamanın ve filtrelemenin yolları.
    00:00:08
    Outlook Web App'in bir numarası vardır
    00:00:10
    kullanım için önceden tanımlanmış filtreler.
    00:00:13
    Odaklanmış Gelen Kutusu, Outlook'unuzu ayırır
    00:00:15
    gelen kutusunu Odaklanmış ve Diğer olmak üzere iki sekmeye ayırın.
    00:00:18
    En önemli e-posta adresiniz
    00:00:20
    mesajlar Odak sekmesindedir,
    00:00:22
    geri kalanı ise kolayca erişilebilir durumda kalır
    00:00:24
    ama diğer etikette yoldan çekildi.
    00:00:27
    Örneğin, haber bültenleri.
    00:00:28
    Outlook neyin Odaklanmış olduğuna nasıl karar verir?
    00:00:32
    Odaklanmış Gelen Kutusu Çalışmaları
    00:00:33
    kullanılan e-postanızın geçmişi,
    00:00:35
    türleri dikkate alarak
    00:00:37
    aldığınız mesajların sayısı,
    00:00:38
    bu mesajların içeriği,
    00:00:39
    ve en çok iletişim kurduğunuz kullanıcılar.
    00:00:42
    Daha sonra hangi e-postaları alacağınızı belirler.
    00:00:44
    okuma ve yanıtlama olasılığı en yüksek olan
    00:00:47
    ve bunları merkezi bir listeye yerleştirir.
    00:00:49
    Memnun değilseniz
    00:00:51
    Odaklanmış Gelen Kutusu özelliği,
    00:00:53
    kolayca devre dışı bırakabilirsiniz
    00:00:54
    Outlook Web App'ten.
    00:00:56
    Sadece ayarlara gidin.
    00:00:59
    Şimdi nasıl olduğunu öğrenelim filtreleme ve
    00:01:01
    Outlook Online çalışmasında iletileri sıralama,
    00:01:03
    filtrelerden başlayarak.
    00:01:05
    Görünüm filtresi, öğelerin tanımlanmasını içerir
    00:01:07
    belirli bir yerde görünmek istiyorsunuz
    00:01:10
    Yalnızca şu öğeleri görüntülemek için görüntüleyin:
    00:01:12
    Belirttiğiniz koşulları karşılayın.
    00:01:14
    Örneğin
    00:01:15
    belirli bir şeyi ararken
    00:01:17
    Mesaj veya mesaj grubu
    00:01:19
    Gelen Kutusu gibi bir klasör içinde,
    00:01:21
    Gönderilmiş Öğeler, Kişisel Klasör vb.
    00:01:24
    Outlook Web App'in bir numarası vardır
    00:01:27
    kullanım için önceden tanımlanmış filtreler.
    00:01:29
    sadece tıklayın filtre düğmesine basın.
    00:01:31
    Mesaj bölmenizin sağ üst köşesinde,
    00:01:33
    Ardından bu seçeneklerden birini uygulayın.
    00:01:35
    Tümü, tüm iletileri görüntüler
    00:01:38
    filtre uygulanmadan.
    00:01:39
    Okunmamış mesajları görüntüler
    00:01:41
    okunmadı olarak işaretlenmiş,
    00:01:43
    Bayraklı iletileri görüntüler
    00:01:45
    takip için bir bayrak içeren,
    00:01:47
    gözden geçirme vb.
    00:01:48
    Bana gönderilen iletileri görüntüler
    00:01:52
    veya kullanıcıya dosya olarak kopyalanır.
    00:01:55
    Ekli dosyalar içeren mesajları görüntüleyin.
    00:01:59
    Benden bahsediyor, arayan mesajları görüntülüyor
    00:02:01
    özellikle dikkatiniz
    00:02:04
    AT sembolüyle belirli bir görev veya konu.
    00:02:07
    Şimdi sıralamaya geçelim.
    00:02:09
    Sıralama, yeniden düzenlemeyi içerir.
    00:02:10
    İleti bölmesindeki öğelerin görüntülenmesi.
    00:02:12
    Varsayılan olarak,
    00:02:13
    Herhangi bir klasördeki iletiler düzenlenir
    00:02:15
    tarihe göre azalan sırada.
    00:02:17
    Bu, en yeni mesaj anlamına gelir
    00:02:19
    üstte görüntülenir.
    00:02:20
    Outlook Online çeşitli sıralama sağlar
    00:02:22
    mesajların görüntülenmesini düzenleme seçenekleri.
    00:02:25
    sadece tıklayın filtre düğmesine basın.
    00:02:27
    Mesaj bölmenizin sağ üst köşesinde,
    00:02:29
    Sonra sıralayın.
    00:02:30
    Ayrıca imkanınız da var
    00:02:32
    E-postalarınızı tarihe göre sıralamak için
    00:02:34
    Bu, Outlook Online'daki varsayılan görünümdür.
    00:02:37
    Grup mesajlarından sıralama ölçütü
    00:02:40
    aynı kullanıcıdan alındı.
    00:02:43
    Mesajlarınızı boyuta göre de sıralayabilirsiniz,
    00:02:47
    önemli veya konu,
    00:02:48
    ve konu satırı olmayan mesajlar
    00:02:52
    1. ve ardından alfabetik olarak görünür.
    00:02:55
    Şimdi tekrar tarihe göre sıralamayı unutmayın.
    00:02:57
    En son mesajları en üstte görüntüleyin.

    No elements match your search in this video....
    Do another search or back to content !


    00:00:00
    Khi bạn có rất nhiều email đến,
    00:00:04
    Outlook cung cấp cho bạn một vài khác nhau
    00:00:05
    Cách sắp xếp và lọc hộp thư đến của bạn.
    00:00:08
    Outlook Web App sở hữu một số
    00:00:10
    của các bộ lọc được xác định trước có sẵn để sử dụng.
    00:00:13
    Hộp thư đến Ưu tiên tách Outlook của bạn
    00:00:15
    hộp thư đến thành hai tab, Tập trung và Khác.
    00:00:18
    E-mail quan trọng nhất của bạn
    00:00:20
    thư nằm trên tab Tiêu điểm,
    00:00:22
    trong khi phần còn lại vẫn dễ dàng truy cập
    00:00:24
    nhưng ra khỏi con đường trên thẻ khác.
    00:00:27
    Ví dụ, bản tin.
    00:00:28
    Làm thế nào để Outlook quyết định những gì là Tập trung?
    00:00:32
    Hộp thư đến tập trung nghiên cứu các
    00:00:33
    lịch sử e-mail của bạn được sử dụng,
    00:00:35
    có tính đến các loại
    00:00:37
    số tin nhắn bạn nhận được,
    00:00:38
    nội dung của những tin nhắn đó,
    00:00:39
    và những người dùng mà bạn giao tiếp nhiều nhất.
    00:00:42
    Sau đó, nó xác định email nào bạn
    00:00:44
    có nhiều khả năng đọc và trả lời nhất
    00:00:47
    và đặt chúng vào một danh sách tập trung.
    00:00:49
    Nếu bạn không hài lòng với
    00:00:51
    tính năng Hộp thư đến tập trung,
    00:00:53
    Bạn có thể dễ dàng vô hiệu hóa nó
    00:00:54
    từ Outlook Web App.
    00:00:56
    Chỉ cần đi tới cài đặt.
    00:00:59
    Bây giờ chúng ta hãy tìm hiểu làm thế nào lọc và
    00:01:01
    sắp xếp thư trong công việc Outlook Online,
    00:01:03
    Bắt đầu với các bộ lọc.
    00:01:05
    Bộ lọc chế độ xem liên quan đến việc xác định các mục
    00:01:07
    Bạn muốn xuất hiện trong một trường hợp cụ thể
    00:01:10
    dạng xem để chỉ hiển thị các mục
    00:01:12
    đáp ứng các điều kiện bạn chỉ định.
    00:01:14
    Chẳng hạn
    00:01:15
    Khi tìm kiếm một cụ thể
    00:01:17
    tin nhắn hoặc nhóm tin nhắn
    00:01:19
    trong một thư mục như Hộp thư đến,
    00:01:21
    Các mục đã gửi, Thư mục cá nhân, v.v.
    00:01:24
    Outlook Web App sở hữu một số
    00:01:27
    của các bộ lọc được xác định trước có sẵn để sử dụng.
    00:01:29
    Chỉ cần nhấp vào nút Bộ lọc trong
    00:01:31
    góc trên cùng bên phải của ngăn thư,
    00:01:33
    sau đó áp dụng một trong các tùy chọn đó.
    00:01:35
    Tất cả hiển thị tất cả các tin nhắn
    00:01:38
    không có bộ lọc được áp dụng.
    00:01:39
    Chưa đọc hiển thị thông báo
    00:01:41
    được đánh dấu là chưa đọc,
    00:01:43
    Gắn cờ hiển thị thông báo
    00:01:45
    chứa một lá cờ để theo dõi,
    00:01:47
    xem xét, v.v.
    00:01:48
    Gửi tôi sẽ hiển thị tin nhắn được gửi đến
    00:01:52
    hoặc sao chép cho người dùng dưới dạng tệp.
    00:01:55
    Hiển thị tin nhắn với các tệp đính kèm.
    00:01:59
    Đề cập đến tôi hiển thị tin nhắn gọi
    00:02:01
    Cụ thể là sự chú ý của bạn vào một
    00:02:04
    Nhiệm vụ hoặc chủ đề cụ thể với biểu tượng AT.
    00:02:07
    Bây giờ chúng ta hãy chuyển sang sắp xếp.
    00:02:09
    Sắp xếp liên quan đến việc sắp xếp lại
    00:02:10
    Hiển thị các mục trong ngăn thư.
    00:02:12
    Theo mặc định,
    00:02:13
    Thư trong bất kỳ thư mục nào được sắp xếp
    00:02:15
    theo ngày theo thứ tự giảm dần.
    00:02:17
    Điều này có nghĩa là tin nhắn mới nhất
    00:02:19
    được hiển thị trên đầu trang.
    00:02:20
    Outlook Online cung cấp một số sắp xếp
    00:02:22
    tùy chọn để sắp xếp hiển thị tin nhắn.
    00:02:25
    Chỉ cần nhấp vào nút Bộ lọc trong
    00:02:27
    góc trên cùng bên phải của ngăn thư,
    00:02:29
    sau đó sắp xếp.
    00:02:30
    Bạn cũng có khả năng
    00:02:32
    để sắp xếp email của bạn theo ngày.
    00:02:34
    Đây là dạng xem mặc định trong Outlook Online.
    00:02:37
    Sắp xếp theo thư từ nhóm
    00:02:40
    nhận được từ cùng một người dùng.
    00:02:43
    Bạn cũng có thể sắp xếp tin nhắn của mình theo kích thước,
    00:02:47
    quan trọng hoặc chủ đề,
    00:02:48
    và tin nhắn không có dòng chủ đề sẽ
    00:02:52
    xuất hiện số 1 và sau đó theo thứ tự bảng chữ cái.
    00:02:55
    Bây giờ đừng quên sắp xếp theo ngày một lần nữa để
    00:02:57
    Hiển thị các thông báo gần đây nhất ở trên cùng.

    No elements match your search in this video....
    Do another search or back to content !


    00:00:00
    當您收到大量電子郵件時,
    00:00:04
    Outlook 為您提供了一些不同的
    00:00:05
    對收件匣進行排序和篩選的方法。
    00:00:08
    Outlook Web App 擁有一個數位
    00:00:10
    可供使用的預定義過濾器。
    00:00:13
    重點收件匣將 Outlook 分開
    00:00:15
    收件匣分為兩個選項卡,“重點”和“其他”。
    00:00:18
    您最重要的電子郵件
    00:00:20
    消息位於「焦點」選項卡上,
    00:00:22
    而其餘的仍然很容易到達
    00:00:24
    但在另一個標籤上不礙事。
    00:00:27
    例如,時事通訊。
    00:00:28
    Outlook 如何確定什麼是重點?
    00:00:32
    重點收件匣研究
    00:00:33
    您使用的電子郵件的歷史記錄,
    00:00:35
    考慮到類型
    00:00:37
    您收到的消息,
    00:00:38
    這些消息的內容,
    00:00:39
    以及與您交流最多的使用者。
    00:00:42
    然後,它會確定您發送哪些電子郵件
    00:00:44
    最有可能閱讀和回應
    00:00:47
    並將它們放在一個集中的清單中。
    00:00:49
    如果您不滿意
    00:00:51
    重點收件箱功能,
    00:00:53
    您可以輕鬆禁用它
    00:00:54
    從 Outlook Web App。
    00:00:56
    只需轉到設置即可。
    00:00:59
    現在讓我們來看看如何過濾和
    00:01:01
    在Outlook Online工作中對郵件進行排序,
    00:01:03
    從過濾器開始。
    00:01:05
    檢視篩選器涉及定義專案
    00:01:07
    你想出現在一個特定的
    00:01:10
    視圖以僅顯示
    00:01:12
    滿足您指定的條件。
    00:01:14
    例如
    00:01:15
    搜索特定時
    00:01:17
    消息或消息組
    00:01:19
    在資料夾(如“收件匣”)中,
    00:01:21
    已發送郵件、個人資料夾等
    00:01:24
    Outlook Web App 擁有一個數位
    00:01:27
    可供使用的預定義過濾器。
    00:01:29
    只需按下「過濾器」中的按鈕
    00:01:31
    消息窗格的右上角,
    00:01:33
    然後應用其中一個選項。
    00:01:35
    全部顯示所有消息
    00:01:38
    未應用篩檢程式。
    00:01:39
    未讀顯示消息
    00:01:41
    標記為未讀,
    00:01:43
    已標記顯示消息
    00:01:45
    包含用於跟進的標誌,
    00:01:47
    審查等。
    00:01:48
    “給我”顯示發送到的消息
    00:01:52
    或作為檔案複製給使用者。
    00:01:55
    顯示帶有附件的郵件。
    00:01:59
    提及我顯示呼叫消息
    00:02:01
    具體來說,你對
    00:02:04
    帶有 AT 符號的特定任務或主題。
    00:02:07
    現在讓我們繼續進行排序。
    00:02:09
    排序涉及重新排列
    00:02:10
    在消息窗格中顯示專案。
    00:02:12
    默認情況下,
    00:02:13
    排列任何資料夾中的郵件
    00:02:15
    按日期降序排列。
    00:02:17
    這意味著最新的消息
    00:02:19
    顯示在頂部。
    00:02:20
    Outlook Online 提供了多種排序
    00:02:22
    用於安排消息顯示的選項。
    00:02:25
    只需按下「過濾器」中的按鈕
    00:02:27
    消息窗格的右上角,
    00:02:29
    然後排序。
    00:02:30
    你也有可能
    00:02:32
    按日期對電子郵件進行排序。
    00:02:34
    這是 Outlook Online 中的預設檢視。
    00:02:37
    按組消息排序
    00:02:40
    從同一用戶處收到。
    00:02:43
    您還可以按大小對消息進行排序,
    00:02:47
    重要或主題,
    00:02:48
    沒有主題行的郵件將
    00:02:52
    出現第一個,然後按字母順序出現。
    00:02:55
    現在不要忘記再次按日期排序
    00:02:57
    在頂部顯示最新的消息。

    No elements match your search in this video....
    Do another search or back to content !


    Mandarine AI: CE QUI POURRAIT VOUS INTÉRESSER

    Reminder

    Show